Equipment
GolfWRX Vault: Avoid these 5 club building disasters

It’s never too late to go back to basics, especially when it comes to club building.
Even with modern new club release cycles the do’s and don’ts of building clubs haven’t changed much in the last few decades except for clubs with adapter sleeves and greater amounts of multi-materials incorporated into the design.
With that in mind its time to revisit an article from the GolfWRX Vault from June 2016.
——————
I’ve been fitting and building golf clubs for more than 15 years, and in that time I’ve seen a lot of really poor workmanship—stuff that would make most GolfWRXers cringe. But like anyone who ever did anything new, I didn’t start being naturally good at putting together clubs. It took a lot of time, ruined components, and trial and error to get where I am today.
I believe my attention to detail now stems from the fact that my dad was a machinist by trade, and anytime we ever worked on something together his attitude was to take your time and do it right the first time. My dad’s approach always had an impact on me, because I feel that if you do something right — even when it takes a bit longer — the job is not only more satisfying but also makes things work better and last longer.
The goal with this article is to help WRXers avoid the most common mistakes and assumptions in club building that lead to broken or ruined clubs, as well as real danger.
Over-prepping a graphite shaft
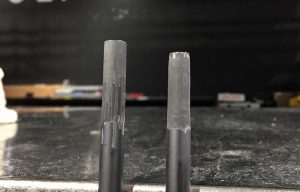
The shaft on the left has been prepped properly. The one of the right, which has noticeable taper, shows signs that layers of graphite have been removed.
This happens far more than it should, and can ruin an expensive new shaft purchase. To prepare a shaft properly for installation, you only need to remove enough of the paint to make sure that the epoxy adheres to the graphite. This is also true for the inside of the hosel.
Be careful to remove residual epoxy, dirt or rust (common with forged carbon steel club heads that have been sitting around for a while), or some type or solvent like the one used to put on grips, as it can cause of bond to break down very quickly. A proper reaming tool, a wire brush and some compressed air (either a small can or a large air compressor) can make cleaning simple, and prevent a golf club from falling apart.
UPDATE: Over prepping specifically applies to shafts that are designed to go into parallel heads and is especially important for 335 shafts with less material at the tip going into drivers and fairway woods. For information on how to properly taper a shaft to go into a tapered head, check out the video below:
Overheating a Shaft When Pulling it
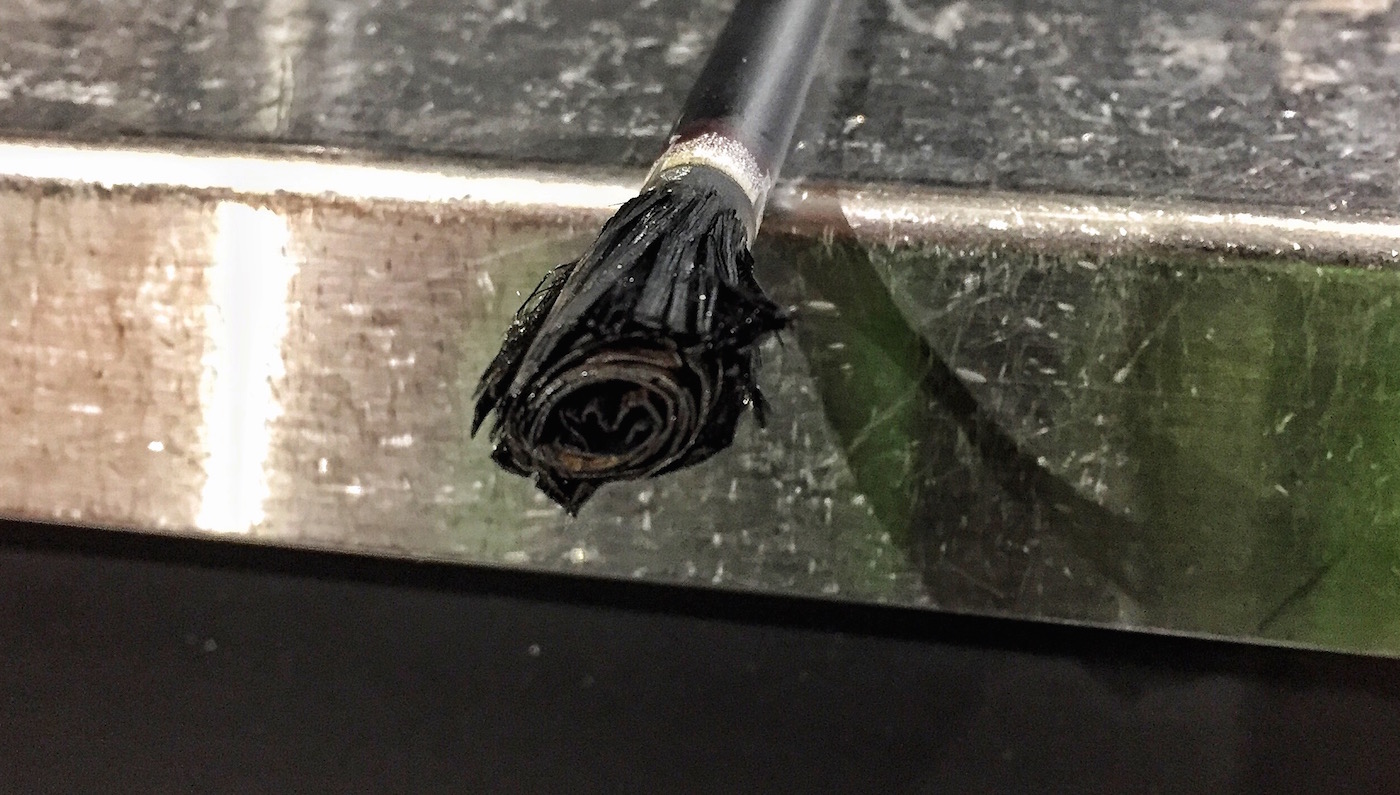
This is what happens to a graphite shaft when overheated, and the resin holding the graphite sheets together breaks down. It’s not always as noticeable, but if the shaft starts to fray it means the bonds have been compromised and it’s more likely to fail.
Overheating a shaft when pulling it is another common mistake that can result in ruining a golf shaft. It also highly increases the chance of breakage. There are quite a few methods I’ve learned over the years to remove a shaft from a club head, from heat guns to large propane torches, but personally I find that using a small butane torch with a regulator for graphite offers the best results. It allows a club builder to easily control and focus the heat only where it’s needed. Bigger torches are fine for iron heads, as long as you don’t damage any plastic badges in the cavity or materials in slots around the head.
One of the best advances in club technology has been the invention and mass adoption of adjustable hosels. They not only help golfers adjust the loft, lie and face angle of club heads, but have also greatly decreased the need to pull shafts. So as long as a golfer is staying with the same metal wood manufacturer, they can usually test several different clubs heads with the same shaft, or vice versa — several different shafts with the same clubhead.

That being said, one of the most important tools that any hobbyist club builder should have or have access to is a high-quality shaft puller. It’s a necessary tool for anyone who wants to do repairs and helps prevent damage to a shaft while pulling it. The more linear pressure that can be applied to the clubhead, and the less heat used to break down the epoxy, the better. It makes sure both the shaft and the head are reusable in the future. For steel shafts, you can use a bit more heat, and twisting isn’t a problem. Again, with increased heat, be careful not to damage any of the badging, or permanently discolor an iron head.
Botching a Grip Installation
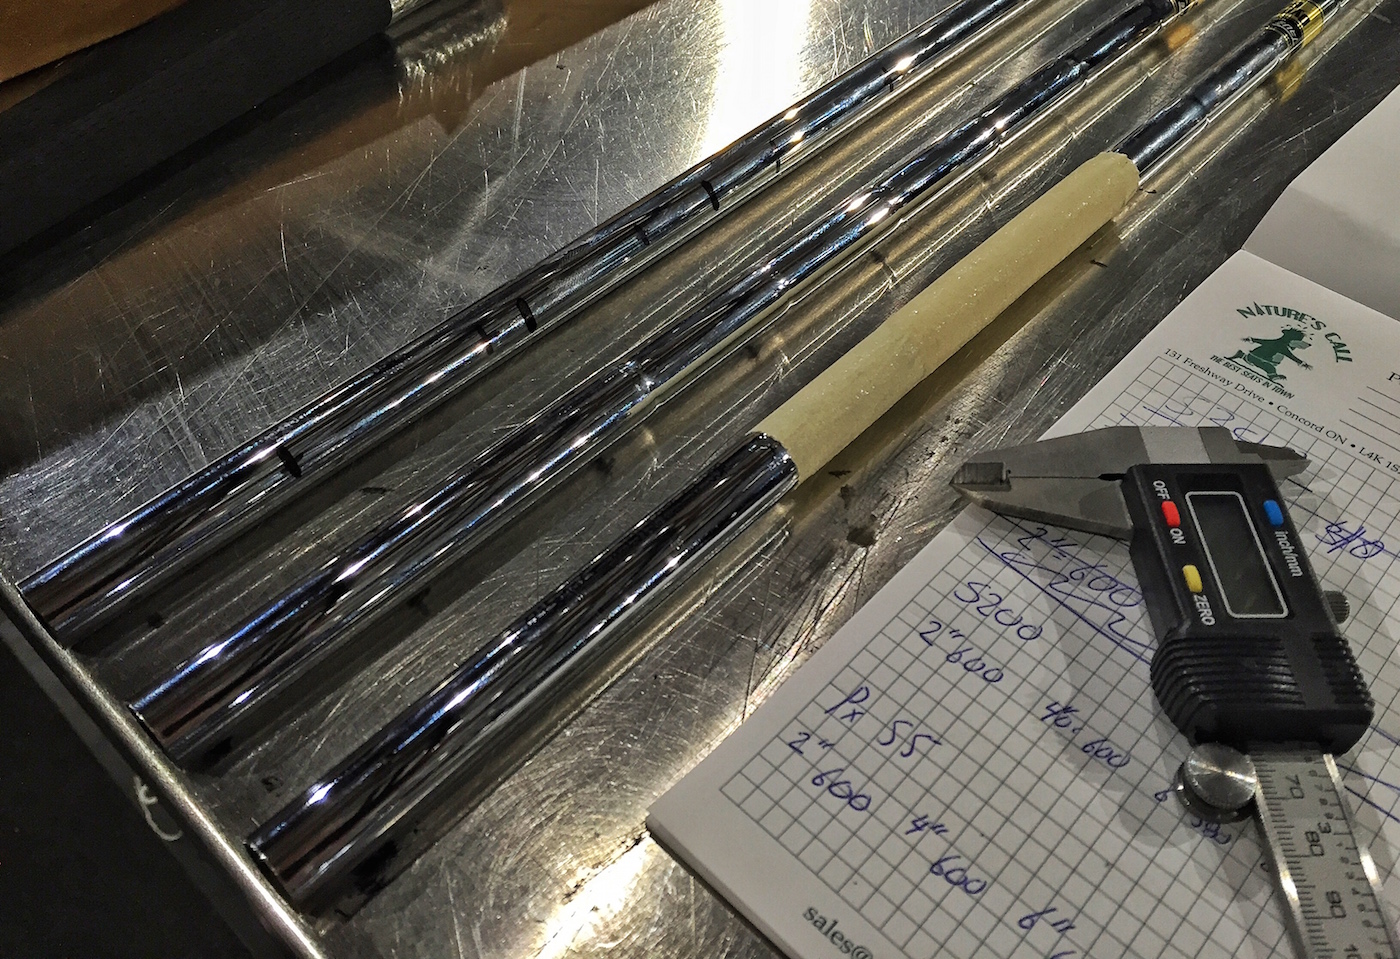
Using calipers and two-sided tape, you can replicate the taper of shafts to makes every grip feel exactly the same size in your set.
This one seems simple, but when really getting down to professional level detail, it is quite important. We ALL have a preference and different opinion of what feels good in a golf grip, as well as different sensitivities. For example, we all have the ability to figure out what apple is bigger, even if blindfolded because over time we all develop brain function to understand shapes and sizes. This also applies to grips. If you use the same grips on your 13 clubs, you could potentially have 4-5 different final sizes depending on how many different types of shafts you use, because many shafts have different butt diameters.
Some shafts have larger butt diameters, while others taper faster than others. That’s why it’s very important to own a quality set of vernier calipers, and know how to properly use them. It’s also the same for putters, since many putter shafts are smaller in diameter. I have lost count of how many times I’ve had people bring me, putters, where the bottom half of the grip is twisting and turning because the installer never paid attention to the interior diameter of the grip, the exterior diameter of the shaft, and how it changed from top to bottom.
Using epoxy that’s doomed to fail
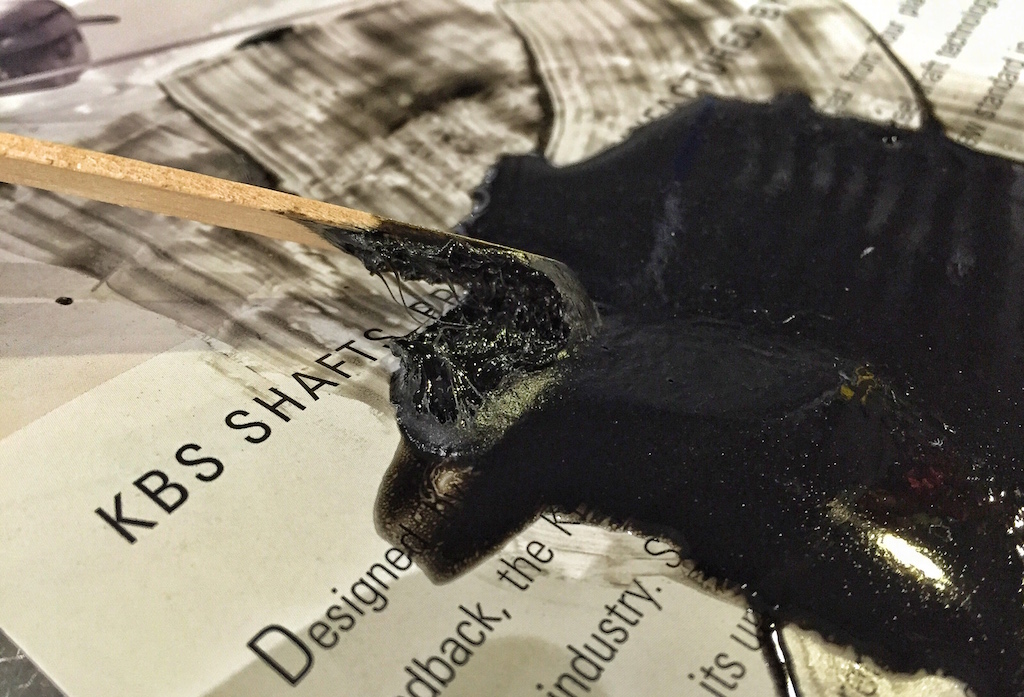
An example of epoxy that although not completely set, is no longer safe for assembling clubs.
I’m a bit of a physics nerd and garage engineer, so this is one of those topics that goes beyond just the physical aspects of club building and into the realm of chemistry.
Here comes my nerd-out moment: In the simplest of explanations for a 0.335-inch driver hosel with an insertion depth of 1.25 inches, the amount of calculated surface area the epoxy can bond between the shaft and the head using the internal dimensions of the head is 1.49 square inches. That’s not a whole lot of area when you consider the centrifugal force being applied to a driver head traveling at 100 mph, and then the forces of torque that also come into play when a shot is struck.
In a PERFECT world, almost zero torque is applied to a shaft when a shot is hit on the center of gravity (CG) of the club head, perfectly aligned with the center mass of the ball, while traveling in the intended direction. This is vectors 101 of physics. Unfortunately, almost every single shot is NOT hit like that, and this is where the epoxy bond is put under the most amount of stress. Lap shear strength of epoxy goes beyond me, but it proves that building a golf club is not just cut and glue after all.
Note: For those of you curious, the most popular epoxies are rated for 4500 psi.
As far are actually working with epoxy, first things first. Always check to see if the epoxy has a best-before date (yep, just like milk). Also, never store epoxy in direct sunlight. If you are using epoxy from a tube in a dispensing gun, you are using what is an almost foolproof method. Plunge out the necessary amount, mix for about a minute (mix! don’t whip), and remember, the less air that gets into the epoxy the better. If air gets in and the epoxy cures with bubbles in it, then you end up with a club that will often “creak.”
For those using two parts in larger bottles, the best way to ensure proper ratios is to pay attention to the weight ratio rather than volume. This isn’t arts and crafts; it’s chemistry, so by using the weight to calculate the ratio you will get the right amount of each part every time, and help decrease the risk of failure down the road. If you have mixed a larger batch and plan on building quite a few clubs at a time, you really have to pay attention to the consistency and viscosity as time goes on. You don’t want to glue a club head with epoxy that has started to set.
Turning an Extension into a Shank

The difference between a good shaft extension (bottom) and a bad one.
This is one of those subjects I don’t even like to talk about. I very much dislike using extensions when building clubs, especially clubs with graphite shafts. Going back to my “do-it-right-the-first-time” mentality, extensions are a Band-Aid fix to a problem that requires surgery. They also counter-balance the club, and by their very nature create a weak point because of the small wall thickness at the butt end of a shaft. The only clubs I don’t mind extending on a regular basis are putters since they are never put under the same level of stress as a club being swung at full speed. I also never extend a club more than 1 inch, because I have been witness to horror stories of clubs that have been overextended that not only break but rip through the grip and cut people’s hands very badly.
If you are going to extend a club, it’s important to make sure the fit is very snug and doesn’t cause the extension to lean in any direction. It’s also best to have the epoxied extension cure with the club on its side to avoid an excess epoxy from running down the shaft and breaking off and causing a rattle.
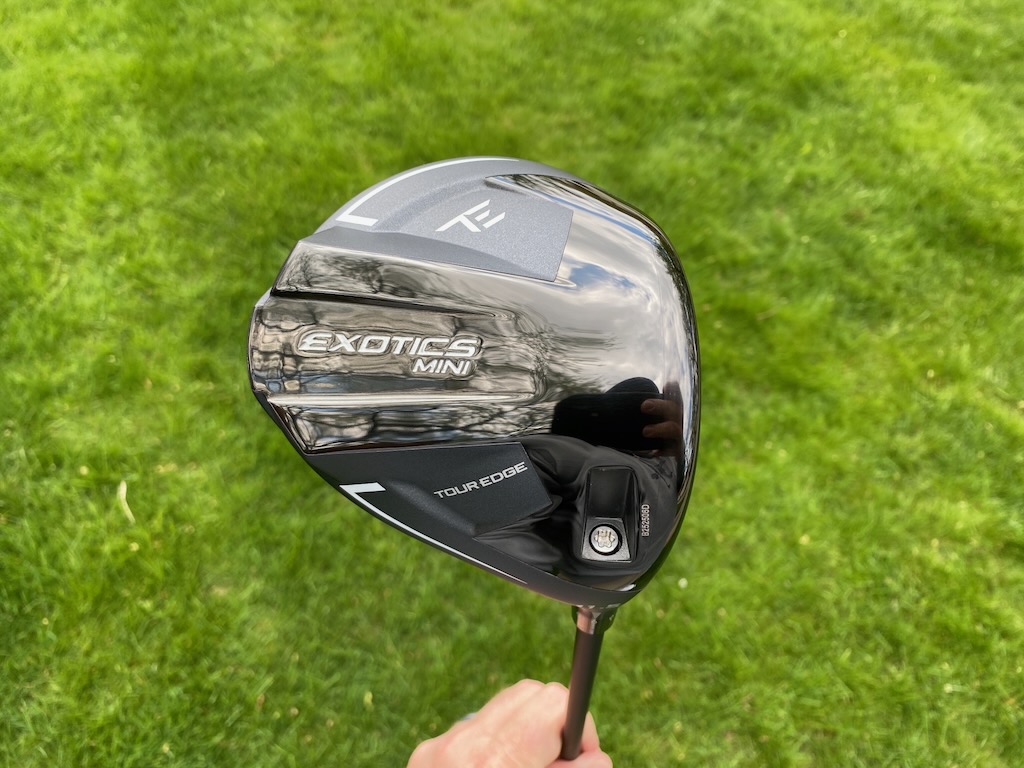
Tour Edge Golf has today introduced the all-new Exotics mini driver, engineered to deliver a powerful combination of speed, control, and versatility in the long game.
The Exotics Mini combines a titanium face with a stainless-steel body in design to balance ball speed with stability and control, creating a versatile option at the top end of the bag.

At the core of the design is Tour Edge’s proprietary Combo Brazing technology, a high-precision thermal bonding process that seamlessly fuses a titanium cup face to a stainless-steel body into a single, continuous structure. By eliminating energy loss found in traditional multi-piece constructions, Combo Brazing is designed to deliver faster face response, more efficient energy transfer, and a uniquely powerful yet controlled feel.

The multi-material construction also allows mass to be positioned lower and deeper in the head in a bid to increase stability, while the thin titanium face is engineered to maintain ball speed across a wider impact area.

“While the initial goal was to enhance control and versatility in the long game, Combo Brazing ultimately drove measurable gains in ball speed and distance within the mini driver category. In robot testing, we’ve documented higher ball speeds, higher launch, reduced spin, and increased carry and total distance compared to leading models.” – Vice President of R&D Matt Neeley

In addition to distance performance, the Exotics mini emphasizes forgiveness through a heavier stainless-steel body that shifts mass toward the perimeter. This configuration increases MOI relative to traditional all-titanium mini drivers, helping preserve ball speed and directional stability on off-center strikes. Paired with Pyramid Face Technology from the Exotics metalwood line, the design is intended to support consistent speed across the face.

To further enhance MOI, a lightweight carbon fiber crown frees additional mass that is strategically repositioned low and deep in the head in design to improve stability and promote optimal launch with controlled spin.

“We designed the Mini to be about five millimeters shallower than other mini drivers on the market. That change improves playability off the deck. From a clean fairway lie, it can function as a strong 3-wood alternative while still providing control off the tee.” – Tour Edge CEO David Glod
An adjustable hosel system allows for loft and lie tuning to dial in trajectory and shot shape, while a fixed 13-gram rear weight helps stabilize the head through impact to improve dispersion consistency. The Exotics Mini Driver is available in 11.5 and 13.5-degree lofts in right-handed models.

Pricing & Availability
The Exotics Mini Driver is available for pre-order beginning today for $399.99 USD at touredge.com, and will be available for purchase at retail outlets worldwide on May 22, 2026.

In our forums, our members have been pitting a Srixon ZXi combo against a TaylorMade P7CB/770 combo. WRXer ‘edutch22’ is on the hunt for a new set of irons and kicks off the thread saying:
“Looking at picking up a new set of irons and think I’ve narrowed it down to Srixon ZXi combo or Taylormade P7CB/770 combo. I am currently a 5 cap and allbeit I feel irons are my weakness. My miss is a little to the toe side. I am decently steep at 4-5 down. Always thought I am high spin but recently on trackman my 7 was spinning at 5800 roughly.
My question or looking for thoughts on which one would benefit me more from a forgiveness standpoint? Or is there another iron is should be looking at entirely? I only get to play about once or twice a week, if I am not playing a 2-3 day event. Thanks in advance.”
And our members have been sharing their thoughts and suggestions in response.
Here are a few posts from the thread, but make sure to check out the entire discussion and have your say at the link below.
- manima1: “You just can’t go wrong with Srixon ZXi7.”
- MattM97: “You have to hit them to know, the V-Sole on the Srixon can be make or break for many.”
- dmeeksDC: “P7CB is more forgiving for me than ZXi7 because my main miss is low middle and the P7CB still flies and spins great on that miss. These are both really nice irons but I like the P7CB more than the Zxi7 and the P770 (or P790) more than the Zxi5. The Srixons are larger so if that gives you confidence that is the way to go. I don’t feel like I get any benefit from the V-sole and the P7CBs live up to their high Maltby forgiveness rating so the TaylorMades have been great for me.”
Entire Thread: “Srixon ZXi combo or TaylorMade P7CB/770 combo? – GolfWRXers discuss”

At GolfWRX, we are a community of like-minded individuals who all experience and express our enjoyment of the game in many ways.
It’s that sense of community that drives day-to-day interactions in the forums on topics that range from best driver to what marker you use to mark your ball. It even allows us to share another thing we all love – buying and selling equipment.
Currently, in our GolfWRX buy/sell/trade (BST) forum, @pianoman0123 has a 2024 Wilson Staff CB/Blade combo up for grabs.

From the listing: “2024 Wilson Staff CB/Blade Combo. 4-8 irons are CB’s and the 9,PW are Blades. 5-PW have Project X 6.0 Shafts and the 4 Iron has a Steelfiber CW110 Stiff Shaft. Standard Length, Lie and Lofts. These are in very good condition the shafts just don’t work for me. Like new Lamkin Grips on the 5-PW and a stock Golf Pride on the 4 Iron. $525 OBO.”
To check out the full listing in our BST forum, head through the link. If you are curious about the rules to participate in the BST Forum, you can learn more here: GolfWRX BST Rules

RBC Heritage Tour Report: More minis, course-specific setups, Spider & GTS launches

Justin Rose WITB 2026 (April): Full WITB breakdown with new McLaren irons

Best fairway woods of 2026: The most versatile fairway woods + the most forgiving fairway woods

What’s the story behind Webb Simpson’s custom-stamped irons?

Cadillac Championship Tour Report: Spieth’s sizable changes, McLaren Golf launches, and more

The 24 players who can win the Masters

Rory McIlroy’s winning WITB: 2026 Masters

Kristoffer Reitan’s winning WITB: 2026 Truist Championship

J.J. Spaun’s winning WITB: 2026 Valero Texas Open

Cameron Young’s winning WITB: 2026 Cadillac Championship


Alex Fitzpatrick WITB 2026 (May)
Driver: Ping G440 LST (9 degrees) Shaft: Fujikura Ventus Black 6 X 3-wood: TaylorMade Qi4D (15 degrees) Shaft: Fujikura Ventus...

Kristoffer Reitan’s winning WITB: 2026 Truist Championship
Driver: Ping G440 Max (9 degrees) Shaft: Mitsubishi Tensei 1K White 60 TX 3-wood: Ping G440 Max (15 degrees) Shaft:...


WITB Time Machine: Rory McIlroy’s winning WITB, 2021 Truist Championship
Rory McIlroy’s victory at the 2021 Wells Fargo Championship 2021 (now the Truist Championship) marked a significant return to form,...


Collin Morikawa WITB 2026 (May)
Driver: TaylorMade Qi4D LS (8 degrees) Shaft: Mitsubishi Diamana D+ Limited 60 TX 3-wood: TaylorMade SIM Tour (14 degrees) Shaft:...
-
 Equipment2 weeks ago
Justin Rose WITB 2026 (April): Full WITB breakdown with new McLaren irons
-
 Equipment1 week ago
What’s the story behind Webb Simpson’s custom-stamped irons?
-
 Equipment2 weeks ago
Cadillac Championship Tour Report: Spieth’s sizable changes, McLaren Golf launches, and more
-
Whats in the Bag3 days ago
Kristoffer Reitan’s winning WITB: 2026 Truist Championship
-
 Whats in the Bag2 weeks ago
Cameron Young’s winning WITB: 2026 Cadillac Championship
-

 Whats in the Bag3 weeks ago
Nelly Korda WITB 2026 (April)
-

 Equipment2 weeks ago
Justin Rose on the switch to McLaren Golf, learnings from previous equipment moves
-

 Tour Photo Galleries2 weeks ago
Photos from the 2026 Cadillac Championship
DukeOfChinoHills
Apr 30, 2021 at 3:24 pm
#6. Using lead tape to counter-balance a shaft by placing it under a grip.
Jon
Apr 1, 2020 at 12:15 am
You’ve not mentioned the formula of depth ratio to extension length re extending any club. In my opinion one of the major mistakes that are made by people doing these improvements to their gear in the home work space/garage.
Scott
Apr 3, 2020 at 9:10 am
Jon, huh? Where else would you make improvements at home?
Euan Hardman
Mar 31, 2020 at 12:08 pm
I suppose that extending graphite shafts with off cuts from old shafts and then using superglue to fix them isn’t really approved?
Shame, I’ve done it several times for short extensions without any breakages……..so far!